This article will explain how to use Radio Buttons in Flutter. You can do this in flutter with the help of ‘Radio’ or ‘RadioListTile’ Widgets.

Watch Video Tutorial
Let’s jump into the code.
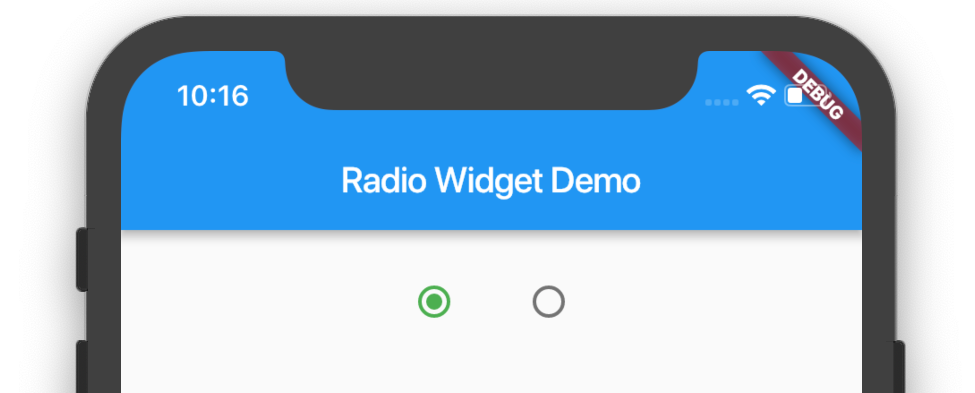
Add Radio Buttons
The Below code adds two radio buttons to the UI.
// Declare this variable
int selectedRadio;

@override
void initState() {
  super.initState();
  selectedRadio = 0;
}

// Changes the selected value on 'onChanged' click on each radio button
setSelectedRadio(int val) {
  setState(() {
    selectedRadio = val;
  });
}

// This goes to the build method
ButtonBar(
  alignment: MainAxisAlignment.center,
  children: <Widget>[
    Radio(
      value: 1,
      groupValue: selectedRadio,
      activeColor: Colors.green,
      onChanged: (val) {
        print("Radio $val");
        setSelectedRadio(val);
      },
    ),
    Radio(
      value: 2,
      groupValue: selectedRadio,
      activeColor: Colors.blue,
      onChanged: (val) {
        print("Radio $val");
        setSelectedRadio(val);
      },
    ),
  ],
)
The ‘value‘ property is the value of each radio button.
The ‘groupValue‘ property is the value that decides whether the radio button in the group should be selected or not.
The ‘activeColor‘ property decides the active color of the radio button.
The ‘onChanged‘ returns the current radio button’s value.
The button changes to selected when the ‘value‘ and ‘groupValue‘ becomes equal.
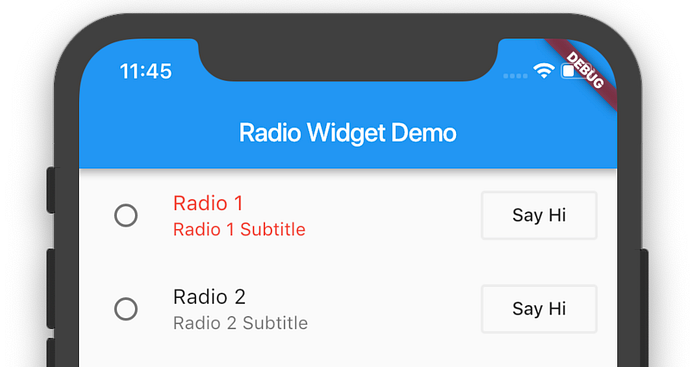
Using RadioListTile
// Declare this variable
int selectedRadioTile;

@override
void initState() {
  super.initState();
  selectedRadio = 0;
  selectedRadioTile = 0;
}

setSelectedRadioTile(int val) {
  setState(() {
    selectedRadioTile = val;
  });
}

// This goes to the build method
RadioListTile(
  value: 1,
  groupValue: selectedRadioTile,
  title: Text("Radio 1"),
  subtitle: Text("Radio 1 Subtitle"),
  onChanged: (val) {
    print("Radio Tile pressed $val");
    setSelectedRadioTile(val);
  },
  activeColor: Colors.red,
  secondary: OutlineButton(
    child: Text("Say Hi"),
    onPressed: () {
      print("Say Hello");
    },
  ),
  selected: true,
),
RadioListTile(
  value: 2,
  groupValue: selectedRadioTile,
  title: Text("Radio 2"),
  subtitle: Text("Radio 2 Subtitle"),
  onChanged: (val) {
    print("Radio Tile pressed $val");
    setSelectedRadioTile(val);
  },
  activeColor: Colors.red,
  secondary: OutlineButton(
    child: Text("Say Hi"),
    onPressed: () {
      print("Say Hello");
    },
  ),
  selected: false,
)
RadioListTile gives us more control over the normal one. It has additional ‘title‘ and ‘subtitle‘ property and a ‘secondary‘ widget. Here I am setting the ‘secondary‘ widget to an OutlineButton for now.
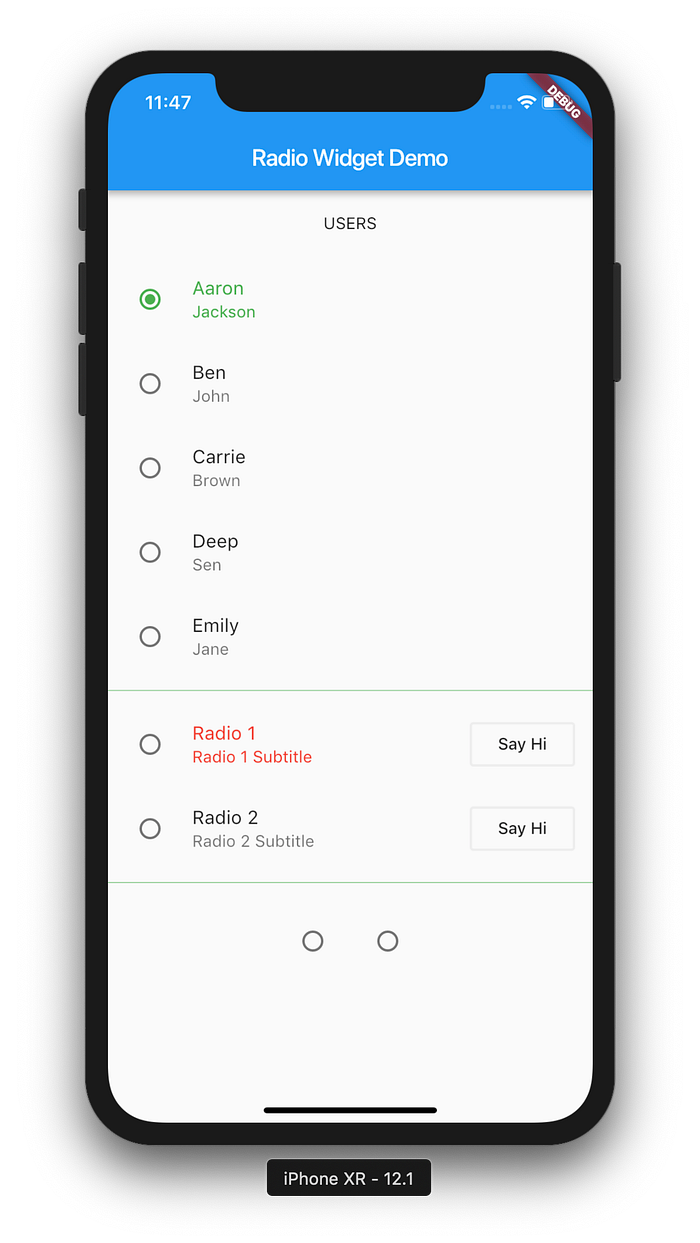
Radio Group Using Objects
Create a new file named ‘user.dart’ and copy these contents.
class User {
  int userId;
  String firstName;
  String lastName;

  User({this.userId, this.firstName, this.lastName});

  static List<User> getUsers() {
    return <User>[
      User(userId: 1, firstName: "Aaron", lastName: "Jackson"),
      User(userId: 2, firstName: "Ben", lastName: "John"),
      User(userId: 3, firstName: "Carrie", lastName: "Brown"),
      User(userId: 4, firstName: "Deep", lastName: "Sen"),
      User(userId: 5, firstName: "Emily", lastName: "Jane"),
    ];
  }
}
Once that is done. Create a List<user> inside you class and initialize in the initState method.
List<user> users;

@override
void initState() {
  super.initState();
  users = User.getUsers();
}

setSelectedUser(User user) {
  setState(() {
    selectedUser = user;
  });
}

List<widget> createRadioListUsers() {
  List<widget> widgets = [];
  for (User user in users) {
    widgets.add(
      RadioListTile(
        value: user,
        groupValue: selectedUser,
        title: Text(user.firstName),
        subtitle: Text(user.lastName),
        onChanged: (currentUser) {
          print("Current User ${currentUser.firstName}");
          setSelectedUser(currentUser);
        },
        selected: selectedUser == user,
        activeColor: Colors.green,
      ),
    );
  }
  return widgets;
}

// In the build method
Column(
  children: createRadioListUsers(),
),
....
When the user taps each radio button in the list, it will trigger onChanged callback with the currentUser and it will set the global selectedUser object, which will match the corresponding groupValue in the list of widgets and when ‘selectedUser == user‘, that means when each radio button’s user value becomes equal to groupValue, it will become selected. The ‘selected‘ property changes the label color to the ‘activeColor‘, here it is Colors.green.
Complete Source Code
MainUI
import 'package:flutter/material.dart';
import 'user.dart';class RadioWidgetDemo extends StatefulWidget {
  RadioWidgetDemo() : super();final String title = "Radio Widget Demo";@override
  RadioWidgetDemoState createState() => RadioWidgetDemoState();
}class RadioWidgetDemoState extends State<RadioWidgetDemo> {
  //
  List<User> users;
  User selectedUser;
  int selectedRadio;
  int selectedRadioTile;@override
  void initState() {
    super.initState();
    selectedRadio = 0;
    selectedRadioTile = 0;
    users = User.getUsers();
  }setSelectedRadio(int val) {
    setState(() {
      selectedRadio = val;
    });
  }setSelectedRadioTile(int val) {
    setState(() {
      selectedRadioTile = val;
    });
  }setSelectedUser(User user) {
    setState(() {
      selectedUser = user;
    });
  }List<Widget> createRadioListUsers() {
    List<Widget> widgets = [];
    for (User user in users) {
      widgets.add(
        RadioListTile(
          value: user,
          groupValue: selectedUser,
          title: Text(user.firstName),
          subtitle: Text(user.lastName),
          onChanged: (currentUser) {
            print("Current User ${currentUser.firstName}");
            setSelectedUser(currentUser);
          },
          selected: selectedUser == user,
          activeColor: Colors.green,
        ),
      );
    }
    return widgets;
  }@override
  Widget build(BuildContext context) {
    return Scaffold(
      appBar: AppBar(
        title: Text(widget.title),
      ),
      body: Column(
        mainAxisAlignment: MainAxisAlignment.start,
        children: <Widget>[
          Container(
            padding: EdgeInsets.all(20.0),
            child: Text("USERS"),
          ),
          Column(
            children: createRadioListUsers(),
          ),
          Divider(
            height: 20,
            color: Colors.green,
          ),
          RadioListTile(
            value: 1,
            groupValue: selectedRadioTile,
            title: Text("Radio 1"),
            subtitle: Text("Radio 1 Subtitle"),
            onChanged: (val) {
              print("Radio Tile pressed $val");
              setSelectedRadioTile(val);
            },
            activeColor: Colors.red,
            secondary: OutlineButton(
              child: Text("Say Hi"),
              onPressed: () {
                print("Say Hello");
              },
            ),
            selected: true,
          ),
          RadioListTile(
            value: 2,
            groupValue: selectedRadioTile,
            title: Text("Radio 2"),
            subtitle: Text("Radio 2 Subtitle"),
            onChanged: (val) {
              print("Radio Tile pressed $val");
              setSelectedRadioTile(val);
            },
            activeColor: Colors.red,
            secondary: OutlineButton(
              child: Text("Say Hi"),
              onPressed: () {
                print("Say Hello");
              },
            ),
            selected: false,
          ),
          Divider(
            height: 20,
            color: Colors.green,
          ),
          ButtonBar(
            alignment: MainAxisAlignment.center,
            children: <Widget>[
              Radio(
                value: 1,
                groupValue: selectedRadio,
                activeColor: Colors.green,
                onChanged: (val) {
                  print("Radio $val");
                  setSelectedRadio(val);
                },
              ),
              Radio(
                value: 2,
                groupValue: selectedRadio,
                activeColor: Colors.blue,
                onChanged: (val) {
                  print("Radio $val");
                  setSelectedRadio(val);
                },
              ),
            ],
          )
        ],
      ),
    );
  }
}
Thats it. So easy
Please share your valuable comments below this post.
Thanks for reading.